Projects

City Of Shapes Project
Fall 2017
This is my city of shapes. I created this using geometric shapes and turning them into buildings with windows and other external things. This city includes a skyscraper hotel with a pool and water slide on it's roof as well as multiple other skyscrapers. I have added color, dimensions, paints, and textures like brick and roofing tiles. This city was built using the program SketchUp and was the first time i have ever used the program.


Click on every image to open in a pop-up or PDF if stated.

AutoCAD Numbers and Letters Fall 2017
This was made using a program called Autodesk AutoCAD. I drew the alphabet, the first 10 numbers and my name with a drawing tool, the grid in the background, and a snap feature. I colored the letters and numbers using the hatch command. This is my first ever AutoCAD drawing.

AutoCAD Galaga Project Fall 2017
Galaga is an arcade game from 1981 and I drew it using the program AutoCAD from Autodesk. I used the snap feature as well as the hatch and the text features. Each square is a one by one space. The aliens and the ship were made from using these one unit by one unit squares.

Willis Tower Project
Fall 2017
I made the Willis Tower on Sketch-up. I used many different tools like the line, select command, paint, shapes, and the push/pull. I started out with one square separated into 9 smaller ones. I raised them to the height I wanted then put in the windows and colors. The front entrance of the tower has a glass room with a globe and flowers. The top of the tower has the antennas that are similar to the ones on the tower in real life.


Mini Golf Project
Fall 2017
SketchUp Version - I remade my mini golf project from AutoCAD and put it in Sketchup. The trees were taken from the 3D Warehouse in the Sketchup program. I made everything 3D and added a creek, lake, trees, bushes, and a cabin/snack bar.
Click on underlined words or click on image to the right.
Mini Golf Project Fall 2017
AutoCAD Version - This is my mini golf drawing project. I made it by using lots of different features like the fillet and offset. This took quite a long time but I had a lot of fun making this. I would hope sometime that someone or I could make this mini golf project become a reality.


Checkers Project
Fall 2017
I made a checker board with the program AutoCAD. I learned how to use different types of tools. One of these tools was the block tool. Using this, I was able to make a checker one entity instead of being multiple. This helped keep the computer from lagging. I also learned how to use the different types of arrays: rectangular and polar. These allowed me to make the checker board itself and the chips.The insert tool was used to copy chips onto the board.

Entry Doors
Fall 2017
I made these doors using AutoCAD. I used the offset and trim features to design this. I used architectural units to map out the doors. The door on the right is most commonly seen in the inside of a house while the door on the left is found as a front door or back door.


Beach House Project
Fall 2017
I made this Beach House because it is one of the most commonly seen types of beach houses. It's design can be found on the east coast of the U.S. All of the windows have an apron, sill, and they show depth. The doors I used were taken from the original house itself. The one on the right was from the last project I did, the Entry Doors. There is an elevator on the very bottom of the house. My most prized part of this house is the railings on the stairs in the front. It is located on Old Orchard Beach in Maine.


AutoCAD Drawing Shapes Project
Fall 2017
Click on Images to open in a PDF
This project is about learning and mastering how to draw 3 dimensional shapes on a 2 dimensional plane. There are four different types of 3-D shapes I learned, isometric, oblique cavalier, oblique cabinet, and 1 point perspective. Isometric drawings are drawn without using horizontal lines and at a 30 degree angle. The two oblique drawings were drawn with the front facing forward and a 45 degree angle. The oblique cavalier drawings have the depth of the shape cut in half. The last one, one point perspective, was drawn using a random vanishing point in the top right region of the area it was drawn in. The standard order of view is what you see if you look at it from any side. The very left shape is the back view. The shape to the right is the left side view, the shape to the right of that is the front view. To the very most right is the right side view. The top shape is the top view and the bottom shape is the bottom view. The sides are colored differently because it shows depth, height, and width. Green is depth, blue is height, and red is width. In most of the figures, the dotted green lines represent the hidden lines, or the lines that you can not see when you are looking at the shape without the shape being see-through.

Figure 1

Figure 2

Figure 3

Figure 4


Figure 5
Figure 6


Figure 7
Figure 8

Figure 9


Figure 10

Figure 11*

Figure 12*
*
The slanted planes on figures 11-13 are colored brown and purple because I decided to mix the two colored planes that created that plane. An example would be having a plane that is slanted downward and to the right. This would be a mix between the red color and the green color, which would get me the brown color. I did the same thing for the purple color but I mixed the blue and the red colors from the planes creating that specific plane.
Figure 13*


SOV Problems Project
These two drawings are unique compared to the previous 13 drawings. These two SOV's were made using only the front, top, and right side views of the SOV part. SOV stands for Standard Order of View which came from how you would finish your drawing by using the sides of a shape to finish it in 3 dimensional point of view. I found these two problems a little bit harder and time consuming but more fun than the previous 13 shapes.
SOV Problem 1
SOV Problem 2

Tetris Game Project
Fall 2017
(Click on image to open in PDF)
I made a Tetris Game by using tools that I have used before and ones that I have not used before. The tools I have used before are the offset and the hatch commands. The tool I have not used was the rotation tool. I used rotation to put the pieces into place. The outside of the squares on the pieces are different shades of the color in the middle to add the 3 dimensional effect to the project. For example, the lighter color goes on top, the color closest to the middle color goes on the sides and the darkest color goes on the bottom. The right side of the thumbnail contains the pieces I used to make the game.

R2D2 Project
Fall 2017
(Click on image to open in PDF)
I made the most popular droid, R2D2, from Star Wars on AutoCAD. I made it by doing different parts at a time. The legs were first. Then came the body with all of the little gadgets like the buzz saw, scomp link, holographic projector, and an electric pike. Finally, i did the head, which is made out of a semi-circle. The head contains the sensor, which is the red circle. I used almost every tool that is shown on the modify tab. Examples include, rotate, mirror, trim, move, and offset. The Title block on the right side of the thumbnail/PDF is the information about the droid.


AutoCAD 3D Shapes With Only Straight Lines
Fall 2017
Click on Images to open in a PDF
I made these 3 dimensional looking shapes out of single, straight lines. At the beginning of the semester, when I first was learning about AutoCAD and all of the tools, I made these 3 shapes. Shape number 3 was required as part of what I had to make while the other two I made on my own time. All 3 shapes could be considered optical illusions because they are misleading and/or deceptive. Shapes number 1 and 3 I can make on a sheet of paper and decided to make them on AutoCAD. The second shape I made on accident while trying to make the first shape.

Building Information Modeling (BIM)
The image above is the BIM of the restaurant that I made. It shows the jobs of people that would end up coming together to put together the real-life version.

Front View

Kitchen View 1
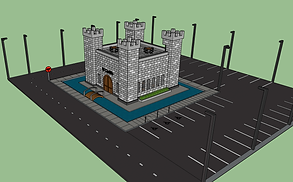
Sketch Up Restaurant Project
Winter 2018
I made this kind of restaurant because it is unique and themed around a castle. In most people's mind, a castle would look like a box with 4 pillars sticking out on the four corners of it. I got my idea for the castle design from this. The restaurant's name is El Castillo because it is Spanish for The Castle. The restaurant contains a lobby area, seating around the main floor space as well as on the roof of the castle. El Castillo also has a garbage area, bathrooms for both females and males, and a kitchen. The windows of the restaurant are also part of the theme of the restaurant. They have bars on the windows to give it a 14th-15th century vibe. The kitchen of El Castillo has multiple cabinets, an oven, two stove tops, boxes for storage on a shelf, a toaster, microwave, sink, and dishwasher. Also part of the kitchen are a storage area or pantry for food and a walk-in refrigerator. From the front of the restaurant, the back right pillar has a stairwell attached that will bring you up the to roof and back down. By the front door, there is a table that a cash register/computer and multiple menus sit. The outside of the restaurant has a 40 car parking lot, lights, stop sign, and the main road leading to the parking lot.
Right Side View

Kitchen View 2

Left Side View

Dining Area 1


